Bevezetés
A Barion x WooCommerce egy WordPress bővítmény, amely lehetővé teszi a Barion fizetési szolgáltatás integrációját WooCommerce webáruházakba. Ezzel a bővítménnyel a webáruház tulajdonosok egyszerűen és biztonságosan fogadhatnak el online fizetéseket a Barion rendszeren keresztül.
Licenc beszerzése és beállítások
A licenc beszerzését és a beállításokat a telepítés előtt kell elvégeznünk.
- Regisztráció a Shop-ban
- Megerősítő linkre kattintás az kapott email-ben
- Bejelentkezés a Shop-ba
- Számlázási profil létrehozása a Shop-ban
- Termék vásárlás a Shop-ban
- Fizetés bankkártyával vagy átutalással
- Licenc kiválasztása a Shop-ban
- Licenc aktiválás WordPress URL (nem a Site Address) beírással a Shop-ba
- Bővítmény letöltése a Shop-ból
- Bővítmény feltöltése és aktiválása WordPress-ben
- Licenc kulcs kimásolás a Shop-ból
- Licenc kulcs beállítás WordPress-ben
Licenc vásárlása
A bővítményt licenc formájában lehet megvásárolni. A vásárlást a Cone Shop felületén lehet megtenni: https://shop.conedevelopment.com/barion-x-woocommerce. Regisztráció, bejelentkezés, majd a számlázási adatok megadása után a kívánt oldalszámban lehet licencet vásárolni.
A vásárlást követően a rendszer automatikusan létrehozza a licenc kulcsot, amelyhez előbb aktiválni kell az áruház URL-jét, majd a bővítmény telepítése után meg kell adni a licenckulcsot.
URL/domain aktiválása
A korábban vásárolt licenceket a https://shop.conedevelopment.com/account/licenses linken érjük el.
Egy-egy licencen belül hozzá tudjuk rendelni áruházunk URL-jét a licenc kulcshoz, így a későbbi aktiválás sikeresen megtörtént.
Telepítés
A telepítést a beszerzés és a beállítások elvégzése után tudjuk elvégezni.
WordPress bővítménykezelőn keresztül
A licenc beállítás oldalán a kívánt verziót kiválasztva letölthetjük a bővítményt, amelyet már telepíteni lehet a WordPress példányra.
Letöltés után keressük meg a letöltött .zip fájlt és töltsük fel a kiszemelt WordPress példányra.
- Navigáljunk a Bővítmények / Új hozzáadása menüpontra.
- Kattintsunk felül a címsorban található Bővítmény feltöltése gombra.
- Az újonnan kinyílt szekcióban kattintsunk a fájl kiválasztására, majd tallózzuk be a korábban letöltött fájlt.
- Kattintsunk a Telepítés most gombra.
A feltöltés után kapunk egy képernyőt, ahol láthatjuk, hogy a bővítményt sikeresen telepítettük. Ez csupán egy egyszerű oldal, ahol a telepítés folyamatait tudjuk végigkísérni.
Ahogy ezen a képernyőn láthatod, egyből tudod is aktiválni. Kattints a Bővítmény bekapcsolása gombra és már fut is a bővítmény.
Ha elmulasztod az aktiválást ezen az oldalon, akkor a Bővítmények / Telepített bővítmények menüpont alatt mindig tudod aktiválni (ki/be kapcsolni, törölni, frissíteni).
A bővítmény beállításait a Bővítmények / Telepített bővítmények / Barion x WooCommerce alatt található a Beállítások link alatt találod meg.
Itt tudod hozzárendelni a licenc kulcsot a bővítményhez. Ez fontos lépés, mert érvényesítés nélkül nem működik a bővítmény, illetve frissítéseket sem lehet letölteni a WordPress rendszerén keresztül.
Composer csomagkezelőn keresztül
A Composer egy elterjedt csomagkezelő PHP alkalmazásokhoz. Előfordul, hogy a WordPress példányt és annak függőségeit Composer-rel szeretnénk kezelni.
Az alábbi minta composer.json bemutatja, hogy a conedevelopment/barion-woocommerce repository-t hogyan szükséges paraméterezni, hogy a megfelelő helyről töltse le a kívánt állományt.
{
    "name": "conedevelopment/example-wp-composer",
    "description": "Example WordPress with Composer",
    "license": "MIT",
    "require": {
        "php": "^8.3.0",
        "conedevelopment/barion-woocommerce": "^1.4.3",
        "roots/wordpress": "^6.6.0"
    },
    "minimum-stability": "beta",
    "config": {
        "preferred-install": {
            "*": "dist"
        },
        "allow-plugins": {
            "composer/installers": true,
            "ffraenz/private-composer-installer": true,
            "roots/wordpress-core-installer": true
        }
    },
    "extra": {
        "installer-paths": {
            "wp-content/mu-plugins/{$name}/": [
                "type:wordpress-muplugin"
            ],
            "wp-content/plugins/{$name}/": [
                "type:wordpress-plugin"
            ],
            "wp-content/themes/{$name}/": [
                "type:wordpress-theme"
            ]
        }
    },
    "repositories": [
        {
            "type": "composer",
            "url": "https://wpackagist.org"
        },
        {
            "type": "package",
            "package": {
                "name": "conedevelopment/barion-woocommerce",
                "version": "1.4.3",
                "type": "wordpress-plugin",
                "dist": {
                    "type": "zip",
                    "url": "https://shop.conedevelopment.com/api/packages/{%CONE_LICENSE_KEY}/download?version=v{%VERSION}"
                },
                "require": {
                    "composer/installers": "^2.3.0",
                    "ffraenz/private-composer-installer": "^5.0"
                }
            }
        }
    ]
}
A {%VERSION} változó a version kulcs értékét adja vissza, jelen esetben a 1.4.3-t. A {%CONE_LICENSE_KEY} értékét viszont nem javasolt közvetlenül a composer.json-ban tárolni (főleg ha ez a git-ben is tárolva van), hanem érdemes valamilyen környezeti változóba szervezni. Ez lehet egy .env változó, vagy valamilyen CI (GitHub Actions, GitLab CI, stb.) környezeti változója:
# Nem valós licenc kulcs!

CONE_LICENSE_KEY=eb819bed-ba18-4e60-9d95-d6d6b5d4364c
Rendszerkövetelmények
A bővítmény kompatibilitása egészen széles spektrumot fed le, ami egy WordPress bővítmény esetében ajánlatos. Ettől függetlenül fontos, hogy a WP verziód és a szervered a lehető legújabb legyen, mind biztonság, mint teljesítmény szempontjából.
- PHP: 7.4+
- WordPress: 6.0+
- WooCommerce: 8.0+
Beállítások
A bővítményben a következő beállítási lehetőségek érhetők el:
- Licenc kulcs: Itt szükséges megadni a bővítmény licenc kulcsát, amelyet a Cone Shop - Licencek oldalon szerezhet be.
- POSKey: Az elfogadóhelyhez tartozó API kulcs, amelyet a Barion felületén lehet beszerezni.
- Barion Email: Az a Barion fiókhoz tartozó email cím, amelyre a fizetések érkeznek.
- Barion Pixel Azonosító: Opcionális mező, amely a Barion Pixel azonosítót tartalmazza a konverziókövetéshez. Ez a beállítás az alap és a full pixel használatához szükséges.
- Tesztmód: Jelöld be ezt a mezőt, ha tesztkörnyezetben szeretnéd használni a bővítményt.
- Foglalásos (kétlépcsős) Fizetések: Jelöld be ezt a mezőt, ha foglalásos (kétlépcsős) fizetéseket szeretnél elfogadni.
- Apple Pay Beállítások: Az integrált Apple Pay használatához szükséges beállítások.
- Google Pay Beállítások: Az integrált Google Pay használatához szükséges beállítások.
- Hibakereső beállítások: Itt a hibakereséshez kapcsolódó beállításokat találod.
Barion rendelés azonosító (OrderRef)
A bővítmény nem egy előtaggal ellátott rendelés azonosítót (pl.: wc-889) ad át a Barion-nak alapértelmezetten, hanem a rendelés kulcsát (pl.: wc_order_q6MXBjFKQwm7B), amely teljesen egyedi.
Erre azért van szükség, hogy az olyan bővítmények, amelyek képesek felülírni a rendelés azonosítóját (pl.: WooCommerce Sequential Order Numbers Pro), ne okozzanak ütközést a rendszerben.
Amennyiben az azonosítót módosítani akarjuk, úgy az barion-woocommerce_order_ref filter segítségével ezt megtehetjük:
add_filter('barion-woocommerce_order_ref', function (string $ref, WC_Order $order): string {
    return 'xyz-'.$order->get_order_number();
}, 10, 2);
Barion Pixel
A Barion Pixel nem más mint egy statisztika szolgáltatás (Barion Metrics), hasonlóan a Google Analytics-hez, vagy a Facebook Pixel-hez.
A lényeges különbség, hogy ez a Barion saját szolgáltatása, amit úgy alakítanak, irányítanak, ahogy szeretnének. A nagy előnye, hogy a felhasználói statisztikákat nem csak marketingre használják, hanem biztonsághoz is.
A kód hasonlóan működik, mint a GTag, eseményekkel követi a felhasználót, így gyűjti róla az adatokat. Ez az adat nem egy általános, hanem e-commerce, vagyis online értékesítésre optimalizált.
Két fajta Barion Pixel van: alap és teljes. Az alapot megkapod a fizetési kapuval, a Full verzió implementálása azonban már plusz erőfeszítést igényel.
Míg a csalás védelem mind a kettőben benne van, addig a fejlett statisztika és az olcsóbb díjak csak a Full Barion Pixel-lel van lehetőség.
Sütikezelés
Ahogy minden esetben, amikor külső szolgáltatót használunk az oldalunkon valamilyen adatgyűjtéshez, úgy Barion Pixel esetén is frissítenünk kell a kapcsolódó adat és sütikezelést, hogy mefelelően tájékoztassuk a felhasználókat.
Általános elvárások
Magyarországon (EU-n belül) az érvényes irányelv a GDPR. Általában igaz, hogy GDPR-t követve szinte biztosan megfelelünk majd más hasonló szabályoknak (mint a CCPA), de a célközönségünk ismeretében mindig az adott terület jogszabályai szerint cselekedjünk.
Barion Pixel esetén (ahogy minden más 3rd-party esetén) ezen jogszabályok betartása az oldal üzemeltető kizárólagos feladata.
- Tájékoztatnod kell a felhasználót az adatgyűjtés meglétéről, annak lényegéről.
- Az adatgyűjtés csak abban az esetben történhet meg, ha a felhasználó beleegyezik abba. Erre használjuk a süti értesítő modulokat, ahol a user explicit beleegyezik.
- Beleegyezés után a felhasználónak tudnia kell visszavonnia a korábbi döntését.
Az hogy mindezt hogyan éred el rajtad múlik. WordPress esetén számos bővítmény van, ami segíthet ebben, de készíthetsz egyedi megoldást is. A sütikezeléshez általában egy összetettebb megoldásra lesz szükséged, részben a fent említett feltételek miatt.
Fontos, hogy valóban megfelelően inicializáld a követőkódot, vagyis ne csak egy tájékoztatás legyen a süti banner, hanem valóban funkcionáljon is.
Ajánlott süti értesítő szöveg
A süti értesítő banner szerepe egy rövid és tömör tájékoztatás, minden másra ott a kapcsolódó és szükséges oldalak, mint az “adat” és “sütikezelés”. Ha még nincs az oldalon, egy hasonló szöveg jó irány lehet:
Az oldalon sütiket és hasonló technológiákat használunk a felhasználók követésére. Egyes sütik nélkülözhetetlenek az oldal működéséhez. Míg mások, mint a statisztika, vagy marketing opcionálisak. Az “Elfogadom” gombra kattintva hozzájárulsz a használatukhoz, míg a “További beállítás” gombbal tetszőlegesen testreszabhatod őket. További részletek a süti és adatkezelés oldalak alatt találsz.
Az félkövér részeket hivatkozással kell ellátnod a megfelelő oldalakra. Értelemszerűen ez egy minta, iránymutatás, úgy szabod testre, ahogy szeretnéd.
Sütikezelési szabályzat
A következő, alapvető (tehát mindig szükséges) sütiket kell feltüntetned a kapcsolódó sütikezelés oldaladon.
| Süti neve | Süti leírása és célja | Szolgáltató | Lejárat |
|---|---|---|---|
| ba_vid | A süti célja, hogy érzékelje a csalásokat online fizetésnél a Barion fizetési kapun keresztül. A böngésző digitális újlenyomatán és online szokásokon alapul. A süti biztosítja, hogy egy adott felhasználót több session-ön át is lehessen azonosítani. |
Barion Payment Zrt. | 1.5 évvel az utolsó frissítés után |
| ba_vid.xxx | A süti célja, hogy érzékelje a csalásokat online fizetésnél a Barion fizetési kapun keresztül. A böngésző digitális újlenyomatán és online szokásokon alapul. A süti biztosítja, hogy egy adott felhasználót több session-ön át is lehessen azonosítani. Gyűjti továbbá a ba_vid, digitális böngésző ujjlenyomatot, első, jelenlegi és utolsó időbélyeget, valamint hogy engedélyezve vannak-e a harmadik féltől a sütik. |
Barion Payment Zrt. | 1.5 évvel az utolsó frissítés után |
| ba_sid | A süti célja, hogy érzékelje a csalásokat online fizetésnél a Barion fizetési kapun keresztül. A böngésző digitális újlenyomatán és online szokásokon alapul. A süti biztosítja, hogy egy adott felhasználót több weboldalon át is lehessen azonosítani. |
Barion Payment Zrt. | 30 perc | ba_sid.xxx | A süti célja, hogy érzékelje a csalásokat online fizetésnél a Barion fizetési kapun keresztül. A böngésző digitális újlenyomatán és online szokásokon alapul. A süti biztosítja, hogy egy adott felhasználót egy weboldalon azonosítsuk. |
Barion Payment Zrt. | 30 perc |
A sütik élettartama az utolsó frissítéstől függ. Miután a felhasználó beleegyezett az időtartam lejártáig nem kell újra beleegyezés hozzájuk.
A személyre szabott marketinghez és hirdetésekhez a következő sütiket kell feltüntetni.
| Süti neve | Süti leírása és célja | Szolgáltató | Lejárat |
|---|---|---|---|
| BarionMarketingConsent.xxx | A célja, hogy tárolja a hozzájárulást az adatgyűjtés beleegyezéséhez, amivel követhető a böngészési session és vásárlási szokások. Elfogadás után a gyűjtött adatokat a bankkártya csalások kizárására, valamint a böngészési és vásárlási szokásaid elemzésére használjuk fel. Valamint célzott és személyre szabott hirdetésekre. |
Barion Payment Zrt. | 1.5 évvel az utolsó frissítés után |
| Media and advertiser partners' cookie | A célja, hogy egyezést mutasson a Barion és annak partner sütijei között. Az egyezés során a partnerünk szervere letölti és tárolja a saját azonosítóját (ID) a felhasználó böngészőjében azért hogy szinkronizálja a Barion és Partner azonosítókat (IDs). |
Lásd az adatvédelmi tájékoztatóban | 1.5 évvel az utolsó frissítés után |
A marketing sütik opcionálisak. Ha nincs hozzájuk beleegyezés, akkor a Barion nem használja és követi a kapcsolódó funkciókat. A Barion Payment Zrt. adatokat gyűjt az oldal látogatásról, arról, hogy mikor mire kattint a felhasználó, vagy hogy milyen termék, szolgáltatás iránt érdeklődik. Követi tovább azt is, ha megakad egy vásárlási folyamat. Széleskörűen gyűjt adatot a felhasználóról és annak viselkedéséről, hogy személyre szabott tartalmat, hirdetést ajánlhasson.
A cél, hogy azokat a vásárlókat tudják megcélozni, akiket valóban érdekel az adott termék, ezt pontosan csak a bekapcsolt, kapcsolódó sütikkel lehet véghezvinni.
A Barion Payment Zrt. ezeket az adatokat tovább adja az adatfeldolgozó és hirdetési partnereinek. További információkat a Barion adatkezelésében találsz.
[*] Ez a leírás a Barion hivatalos dokumentációján alapul. Mielőtt bármit közzéteszel az oldaladon, győződj meg róla, hogy a fordításaink helyesek az eredeti tartalomhoz képest.
Alap Pixel
Az Alap Pixel használatához nincs szükség semmilyen plusz beállításra, csak a Barion Pixel azonosítót kell megadni a bővítmény beállításainál. Ezt követően a bővítmény automatikusan beilleszti a szükséges kódot a webáruházba és alkalmazza az alap funkciókat.
Full Pixel
A kedvezőbb díjú kereskedői csomagok előfeltételeként további bővített kód befűzése is lehetséges, amely célja a csalásmegelőzés mellett a marketing célú adatgyűjtés is. Ez a full vagy teljes pixel.
A weboldalban elhelyezett Barion Pixel a látogatókról olyan adatokat gyűjt, mind például, hogy milyen termékeket láttak, mire kattintottak, kerestek, miket tettek kosárba, miket vettek meg.
Mivel itt az adatgyűjtés a cél, így a vásárlótól ehhez explicit hozzájárulás szükséges. Jóvághagyás előtt a Barion ezt ellenőrzi is!
A bővítmény lehetőséget nyújt arra, hogy egyszerűen bekössük a Pixel jóváhagyás/elutasítás eseményeket egy egyedileg fejlesztett, vagy bővítmény formájában beépített hozzájárulás kezelő (consent manager) megoldásba.
Ezt egy JavaScript eseménnyel tudjuk aktiválni vagy deaktiválni:
// Hozzájárulás
document.dispatchEvent(new CustomEvent('barion:consent', { detail: { accepted: true } }));

// Visszavonás/megtagadás
document.dispatchEvent(new CustomEvent('barion:consent', { detail: { accepted: false } }));
Az adatok a Barion szerverei felé kerülnek továbbításra, a Kereskedőnél ezek nem kerülnek gyűjtésre, tárolásra, sem kezelésre.
CookieYes integráció
A CookieYes az egyik legnépszerűbb sütikezelő bővítmény. Első lépésként a Barion által meghatározott sütiket (amely két csoportra osztható) a megfelelő kategóriákba kell felvinni. Az alapvető sütiket a functional csoportba, hiszen azok a működéséhez szükséges sütik, az alap Pixel megfelelő működéséhez szükségesek. A második csoport tartozik a Full Pixel funkcionalizásához, ez opcionális sütiket jelent. Jelen esetben az analytics csoportba soroltuk őket, de ettől eltérő beállítást is lehet alkalmazni.
Az egyszerű integrációt elősegítve, az alábbi mintakódot lehet használni, vagy az igénynek megfelelően módosítani:
<script>
    document.addEventListener('cookieyes_consent_update', function (e) {
        document.dispatchEvent(
            new CustomEvent('barion:consent', { detail: { accepted: e.detail.accepted.includes('analytics') } })
        );
    });
</script>
A kódot a
<head>elembe, vagy a</body>elé javasolt elhelyezni.
Foglalásos/kétlépcsős fizetés beállítása
Barion-on keresztül lehetőség van foglalásos (kétlépcsős) fizetési megoldás alkalmazására is, amit a bővítményünk is támogat.
Pontosan mit jelent a foglalásos fizetés?
Egylépcsős fizetés esetében, a kártyaadatok megadása után, a Barion azonnal levonja a kártyáról az összeget. A legtöbb esetben ez az eljárás tökéletesen elég.
Azonban lehetnek esetek, amikor a rendelés végleges összege csak később derül ki, tehát a rendelés leadása és a fizetés után. Ebben az esetben lehetőségünk van foglalásos tranzakciókat indítani, amely a kártyaadatok megadása után, nem levonja, hanem csak befoglalja (előfoglalja) az adott összeget, majd második lépésként, amikor a kereskedő pontosan tudja a rendelés összegét, egy API kérés (manuálisan küldve a WooCommerce rendelések oldaláról) segítségével levonhatja a lefoglalt összeget.
A második lépésben többet nem lehet levonni mint az eredetileg befoglalt összeg. Tehát a rendelés értékének módosítása után a terhelhető összeg maxium a befoglalt összeget érheti el.
A foglalásos fizetés engedélyezése
A bővítmény beállításoknál (WooCommerce / Beállítások / Fizetési módok) / Barion) kapcsolhatjuk be a foglalásos fizetést:
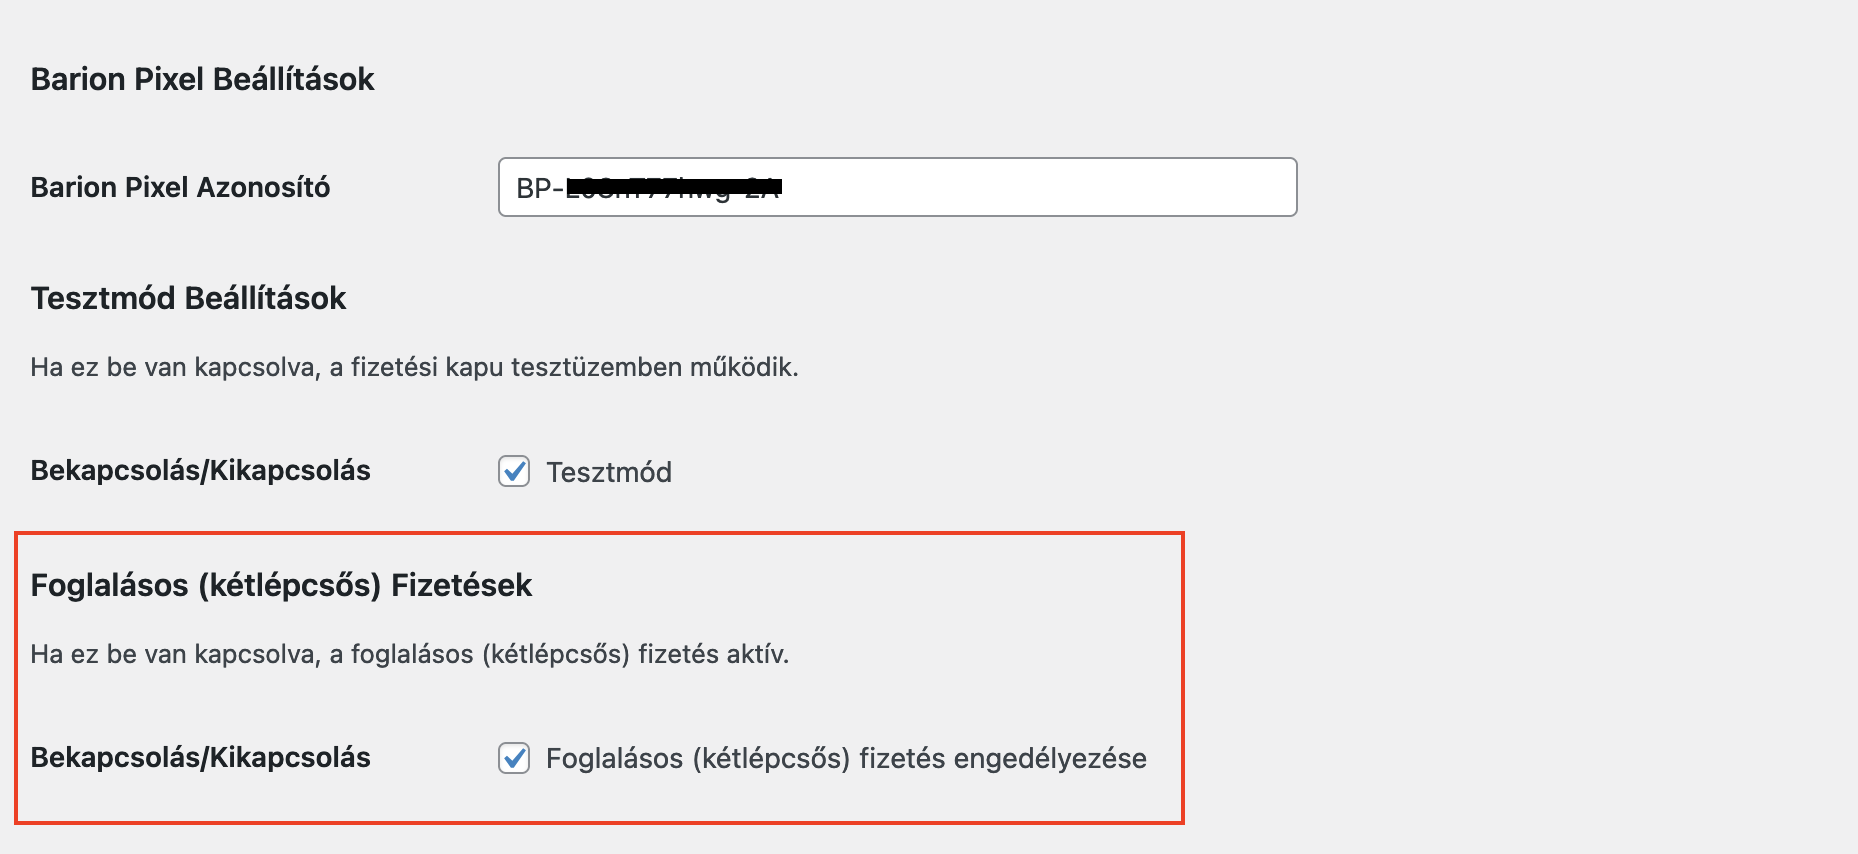
Figyelem: ennek bekapcsolásakor minden Barion tranzakció foglalásossá válik.
Csak bizonyos rendeléseknél szeretném be- vagy kikapcsolni a foglalásos fizetést. Hogyan tehetem meg?
Előfordulhat, hogy csak bizonyos esetekben szeretnénk bekapcsolni ezt a funkciót, ezért ezt a barion-woocommerce_reservable filterrel egyedi feltételhez kötve kezelhetjük (hogy mikor akarunk foglalásos fizetést).
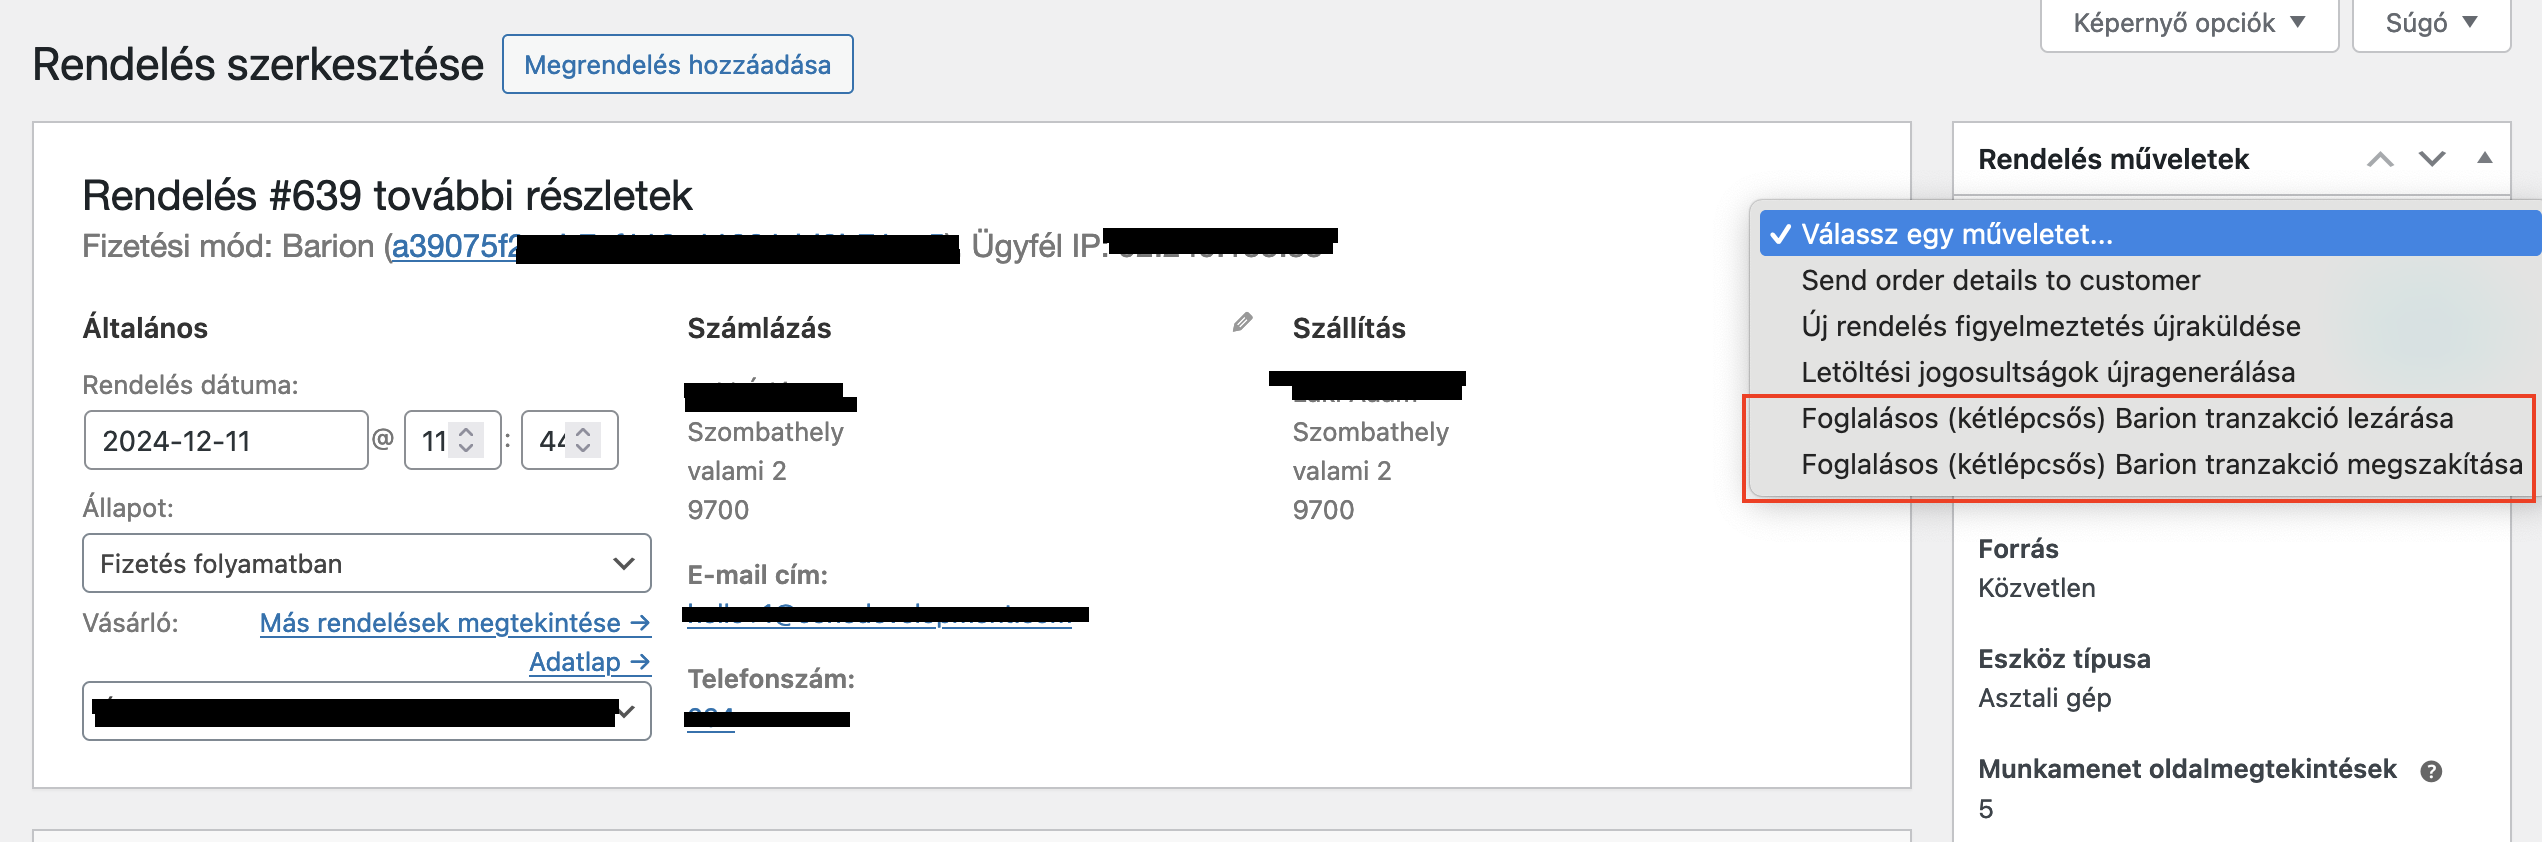
A befoglalt összeg terhelése, feloldása
A második lépcső, azaz a befoglalt terhelése vagy feloldása, csak manuálisan indítható a rendelés admin felületén.
Amennyiben az újraszámolt rendelés összege nagyobb mint az eredetileg befoglalt összeg, hogy ne fusson hibára a az API kérés, a befoglalt összeg kerül átadásra.
A "Rendelés műveletek" doboz alatt elérhető egy új opció, amelynek lefuttatásával indíthatjuk az API kérés a Barion felé. Ezt követően a Barion IPN-t küld a webáruház felé amelyet a bővítmény feldolgoz hasonlóan az egylépéses fizetéshez.
Ismétlődő fizetések
Az ismétlődő fizetések, előfizetések kezelésére a legnépszerűbb - és talán a legjobb - megoldás a WooCommerce Subscriptions bővítmény.
A bővítményünk csak és kizárólag a WooCommerce Subscriptions integrációt biztosítja
Támogatott előfizetés műveletek és ismert korlátok
| Művelet | Kulcs | Támogatás |
|---|---|---|
| Előfizetés | subscriptions |
✅ |
| Megszakítás | subscription_cancellation |
✅ |
| Reaktiválás | subscription_reactivation |
✅ |
| Fizetési mód változtatás | subscription_payment_method_change |
✅ |
| Dátum változtatás | subscription_date_changes |
✅ |
Egyszerre több előfizetés *
multiple_subscriptions❌ |
|
* Ez a korlát arra vonatkozik, hogy a kigenerált tokeneket egy előfizetésnél használjuk fel. Másik csomagra való előfizetés lehetséges, azonban ott újra regisztrálni kell a kártyát, amely újra kigenerálja a megfelelő tokeneket.
Recurring Tokenekkel kapcsolatos információk
A recurring kártyaregisztrációs fizetést követően, a bővítmény egy tokent generál, amelyekkel a későbbiekben az kereskedő a terhelést tudja kezdeményezni (pl.: amikor a előfizetés fordulója esedékes).
Néhány fontos megjegyzés a tokenekkel kapcsolatban:
- Minden előfizetéshez külön tokent regisztrálunk
- Az adatbázis védelme és az adatok megfelelő tárolása a kereskedő felelőssége
- A tokenes fizetés egy WooCommerce Subscriptions eseményhez van kötve, nem a Barion bővítmény kezdeményezi
- A WooCommerce Subscriptions bővítmény megfelelő konfigurálása a kereskedő felelőssége. Javasoljuk a WP-CRON kiváltását egy szerveroldalon megfelelően konfigurált megoldással. További információ: https://developer.wordpress.org/plugins/cron/
- Ha az előfizetés lejárt, vagy megszakításra került úgy a token törlésre kerül
- Ha a lejárt vagy véglegesen megszakított fizetést előfizetést folytatni kívánja az előfizető, úgy új token kerül regisztrálásra, így az előfizetés újra aktívvá válik
Integrált Apple Pay
A v1.3.0 verziótól a bővítmény már támogatja az integrált Apple Pay fizetést az áruházak felületén. Míg Barionon keresztül eddig is volt lehetőség Apple Pay-el fizetni, addig ezzel az új fejlesztéssel mindezt már a te áruházadon belül teheti meg a felhasználó, átirányítás nélkül, lényegében egy (ujjlenyomat, vagy arcfelismerés) azonosítással.
Technikai feltételek, beállítások
Az Apple Pay csak a WooCommerce Block Checkout felületén elérhető, mivel klasszikus checkout nézet nem támogatja az express fizetési módokat! Ez egy olyan megkötés, amihez muszáj volt tartanunk magunkat, mivel úgy látjuk, hogy a régi Woo fizetési felület technikailag már elavult.
Jó tudni: WooCommmerce-ben jelenleg két különböző - és technikailag merőben eltérő - fizetési felületet tudsz használni. Mind a kettőnek megvan a maga előnye és hátránya. Ebben az esetben az "express fizetési mód" az, ami lehetővé teszi, hogy az Apple Pay-t fenntarthatóan és üzembiztosan implementáljuk.
Az integráció felé, csak pár lépést kell tennünk:
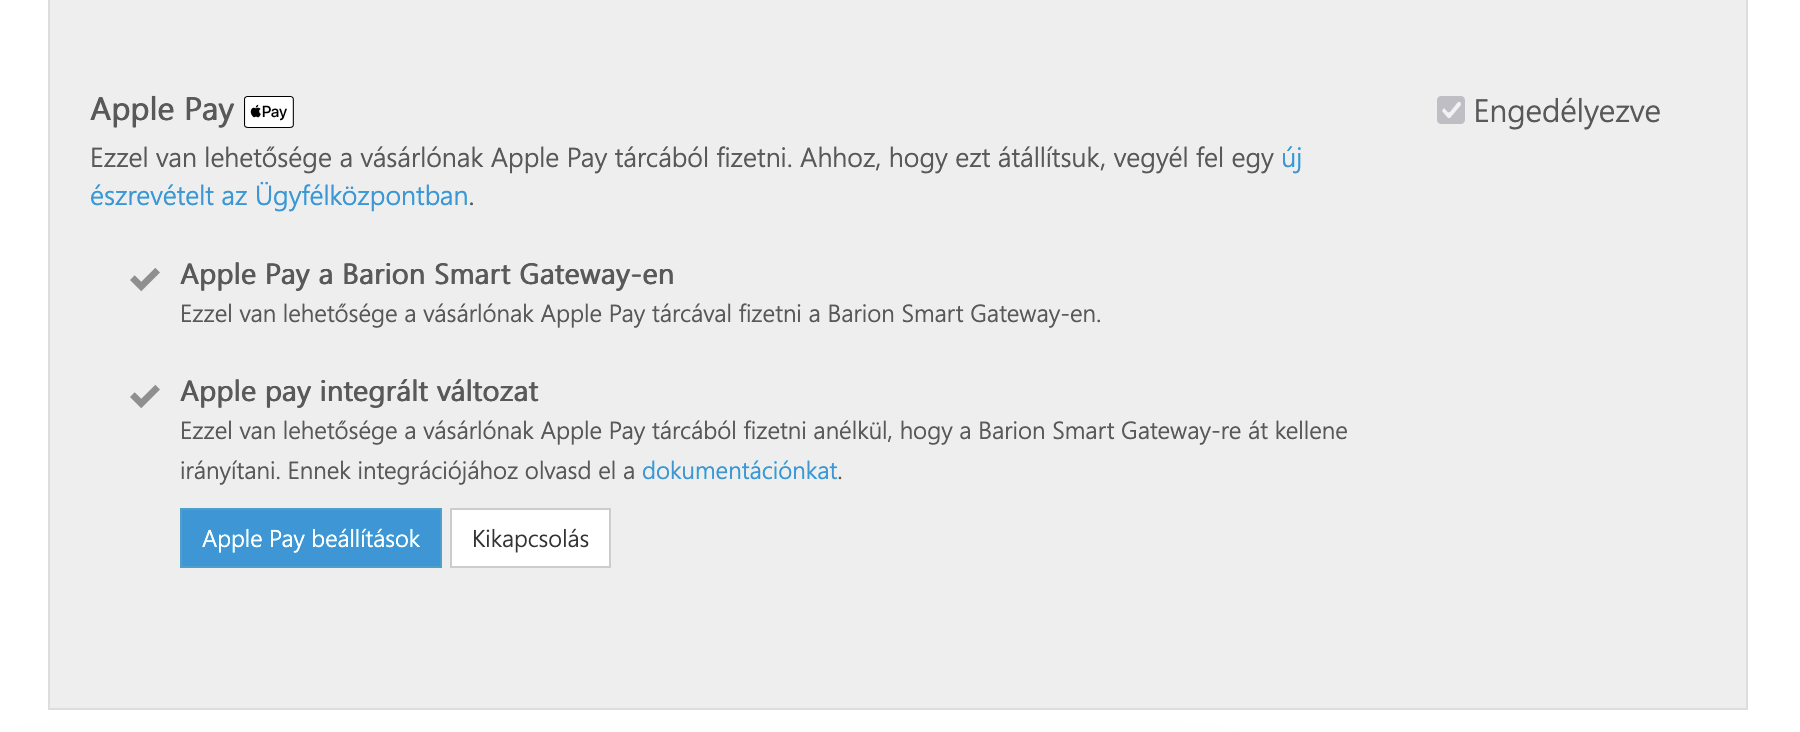
- A Barion admin felületén, az elfogadóhely beállításaiban Apple Pay menüpontban, regisztráljuk a domaint (pl.:
my-shop.comvagyapple-pay.my-shop.com) ahol használni akarjuk a fizetési módot. - A friss Well-known fájlt töltsük le, majd töltsük fel a megfelelő helyre a szerveren. A cél útvonal a "document root"-ban, egy
.well-knownmappa lesz, így ez a fájl publikusan elérhetővé válik. - Fejezzük be a domain regisztrációt az admin felületen.
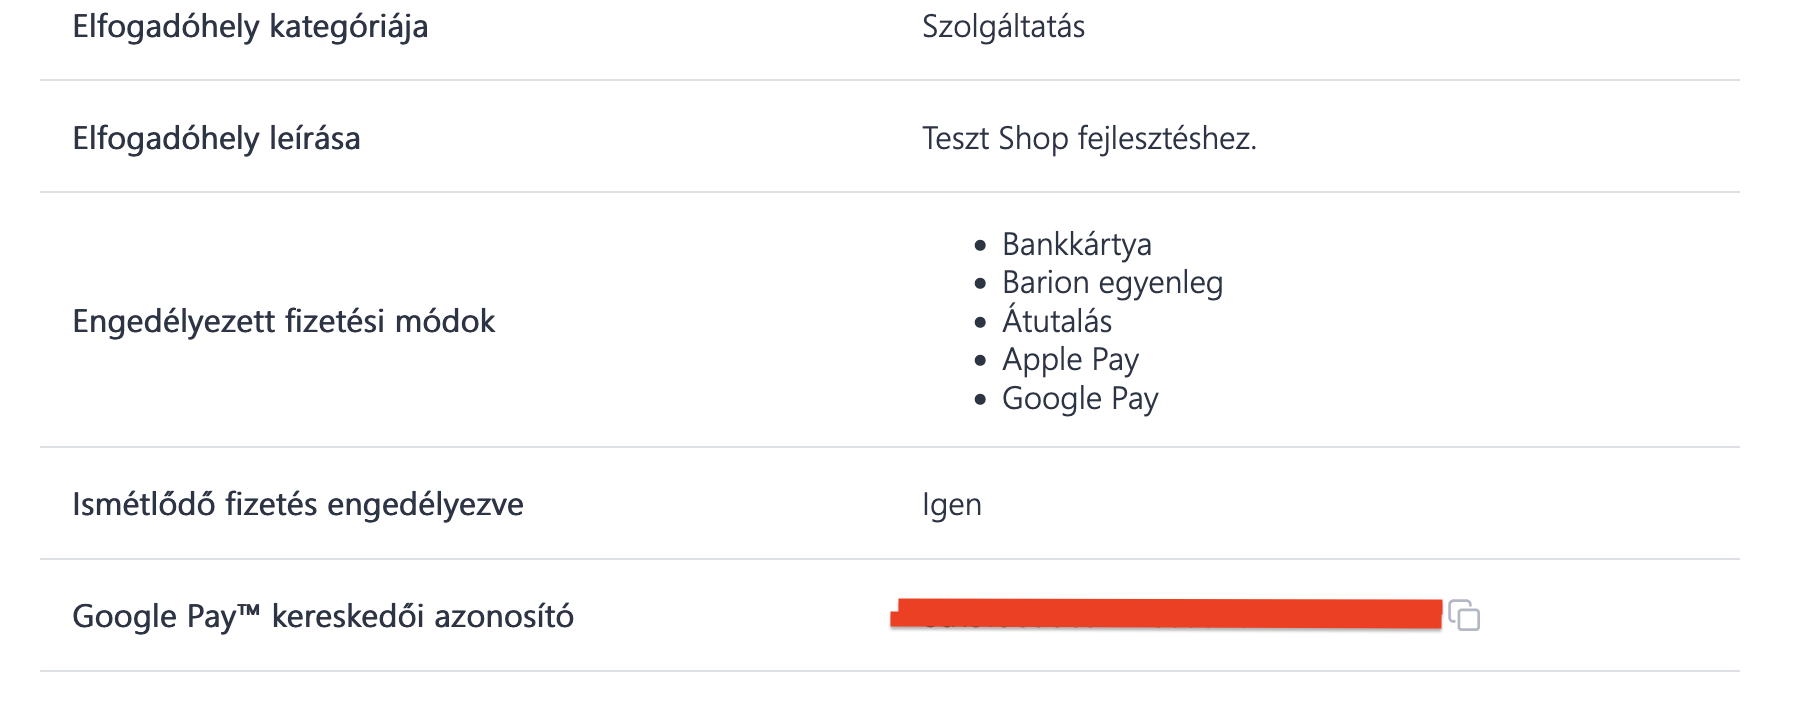
- Másoljuk ki az elfogadóhely
Publikus azonosító-ját, ezt az elfogadóhely részletei között lehet megtalálni
Ezt követően a bővítmény beállításokat kell elvégezni:
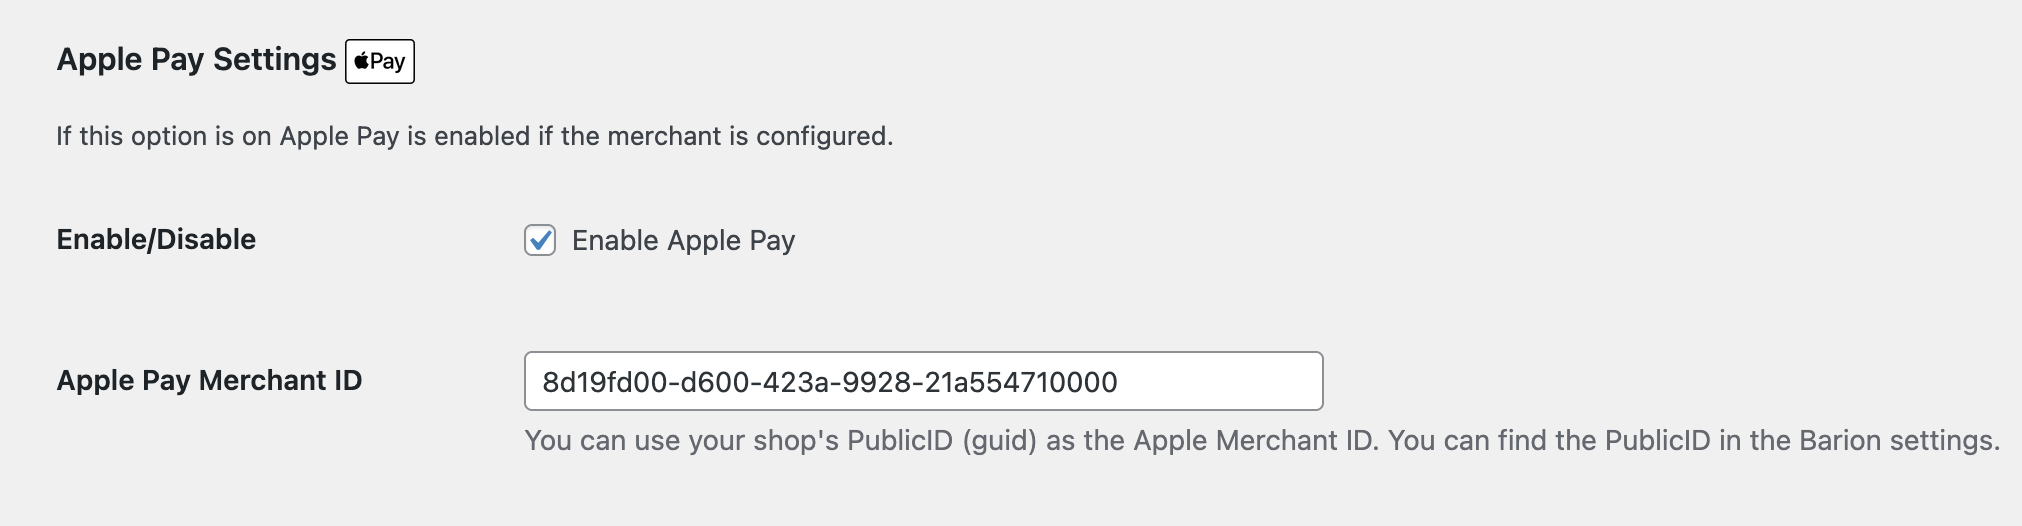
- Kapcsoljuk be az Apple Pay fizetési módot a bővítményen belül
- Adjuk meg a korábban kimásolt
Publikus azonosító-t azApple Pay Merchant IDmezőbe - Mentsük el a beállításokat
Sandbox és tesztelés
Bővebb leírás az Apple oldalán található.
- A teszteléshez szükségünk van egy olyan Apple készülékre. Lehetőleg egy olyan eszközt válasszunk, amit csak erre a célra tudunk használni, hiszen egy sandbox Apple fiókkal kell belépni, hogy semmilyen adat ne vesszen el.
- Írjunk a Barionnak, hogy hozzanak létre egy sandbox Apple fiókot. Ehhez biztosítanunk kell egy olyan e-mail címet, amelyhez hozzáférésünk van, de még nincs beregisztrálva az Apple rendszerében, sem éles, sem sandbox környezetben.
- Ezt követően a Barion létrehozza fiókot és a generált jelszót elküldik nekünk.
- Az e-mail címet meg kell erősíteni, így az Apple kiküld egy megerősítő e-mailt a megadott címre.
- Lépjünk be a sandbox fiókkal az eszközre.
- Adjunk hozzá egy teszt kártyát az Wallet-hez (a fenti linken számos teszt kártya közül választhatunk).
- Kezdjük el a tesztelést!
Apple Pay gomb testreszabása
Az Apple Pay gombot CSS segítségével tudjuk testreszabni:
<style>
    apple-pay-button {
        --apple-pay-button-width: 140px;
        --apple-pay-button-height: 30px;
        --apple-pay-button-border-radius: 5px;
        --apple-pay-button-padding: 5px 0px;
    }
</style>
A CSS-t a <head> részbe, vagy a style.css fájlba lehet elhelyezni egyszerűen. Illetve a Testreszabás -> További CSS részbe is bemásolható, a style tag nélkül.
Korlátok
Az Apple Pay-es fizetés esetén az ismétlődő fizetések nem támogatott funkció.
További (első sorban technikai) információk: https://docs.barion.com/Apple_Pay
Integrált Google Pay
A v1.4.0 verziótól a bővítmény már támogatja az integrált Google Pay fizetést az áruházak felületén. Míg Barionon keresztül eddig is volt lehetőség Google Pay-el fizetni, addig ezzel az új fejlesztéssel mindezt már a te áruházadon belül teheti meg a felhasználó, átirányítás nélkül, lényegében egy (ujjlenyomat, vagy arcfelismerés) azonosítással.
Technikai feltételek, beállítások
A Google Pay csak a WooCommerce Block Checkout felületén elérhető, mivel klasszikus checkout nézet nem támogatja az express fizetési módokat! Ez egy olyan megkötés, amihez muszáj volt tartanunk magunkat, mivel úgy látjuk, hogy a régi Woo fizetési felület technikailag már elavult.
A Google Pay kereskedői azonosítót a Barion admin felületén találjuk, az elfogadóhely beállításainál, a Google Pay menüpont alatt. Ezt szükséges kimásolni:
Ezt követően a bővítmény beállításokat kell elvégezni:
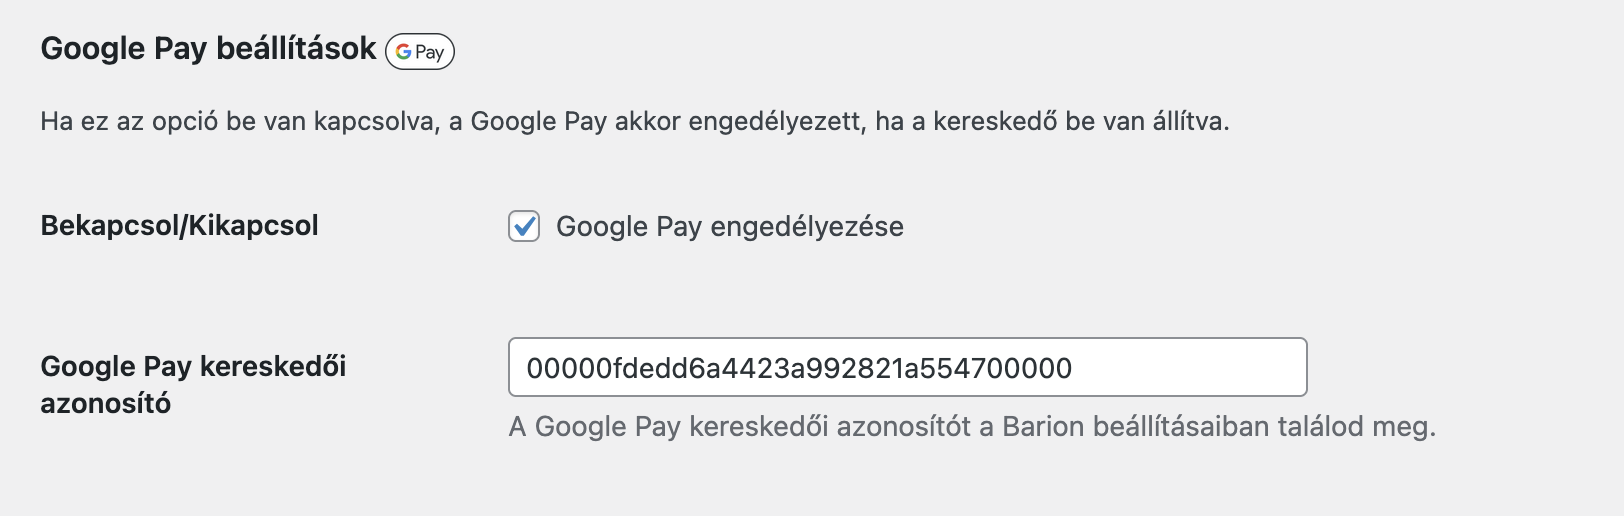
- Kapcsoljuk be a Google Pay fizetési módot a bővítményen belül
- Adjuk meg a korábban kimásolt Google Pay Merchant ID-t a megfelelő mezőbe
- Mentsük el a beállításokat
Sandbox és tesztelés
Amennyiben a bővítményt sandbox módban használjuk, úgy a Google Pay is sandbox módban fog működni. Fizetéskor a Google Pay felületén a teszt kártyák közül választhatunk.
Hook Index
A bővítmény lehetőséget nyújt arra, hogy filtereken keresztül irányítsuk a működést. A hookok megfelelő használatával akár egészen egyedi megoldásokat is alkalmazhatunk.
barion-woocommerce_icon (Filter)
Amennyiben szeretnénk felülírni az alapértelmezett Barion logót a "Pénztár" oldalon, úgy az barion-woocommerce_icon filter segítségével ezt megtehetjük:
add_filter('barion-woocommerce_icon', function (string $url): string {
    return $url;
});
barion-woocommerce_order_ref (Filter)
A bővítmény a rendelés kulcsát adja át a Barionnak (pl.: wc_order_q6MXBjFKQwm7B), amely teljesen egyedi. Amennyiben ezt módosítani akarjuk, úgy a barion-woocommerce_order_ref filter segítségével ezt megtehetjük:
add_filter('barion-woocommerce_order_ref', function (string $ref, WC_Order $order): string {
    return 'xyz-'.$order->get_order_number();
}, 10, 2);
barion-woocommerce_payment_cancelled_order_status (Filter)
A megszakított fizetés után a rendelést pending állapotúra állítja a bővítmény. Amennyiben ezt módosítani akarjuk, úgy a barion-woocommerce_payment_cancelled_order_status filter segítségével ezt megtehetjük:
add_filter('barion-woocommerce_payment_cancelled_order_status', function (string $status, WC_Order $order): string {
    return 'pending';
}, 10, 2);
barion-woocommerce_payment_failed_order_status (Filter)
A sikertelen fizetés után a rendelést failed állapotúra állítja a bővítmény. Amennyiben ezt módosítani akarjuk, úgy a barion-woocommerce_payment_failed_order_status filter segítségével ezt megtehetjük:
add_filter('barion-woocommerce_payment_failed_order_status', function (string $status, WC_Order $order): string {
    return 'failed';
}, 10, 2);
barion-woocommerce_payment_expired_order_status (Filter)
A fizetés időkorlát túllépését követően a rendelést cancelled állapotúra állítja a bővítmény. Amennyiben ezt módosítani akarjuk, úgy a barion-woocommerce_payment_expired_order_status filter segítségével ezt megtehetjük:
add_filter('barion-woocommerce_payment_expired_order_status', function (string $status, WC_Order $order): string {
    return 'cancelled';
}, 10, 2);
barion-woocommerce_payment_timeout (Filter)
A fizetés időkorlát alapértelmezett értéke 30 perc. Amennyiben ezt módosítani akarjuk, úgy a barion-woocommerce_payment_timeout filter segítségével ezt megtehetjük:
add_filter('barion-woocommerce_payment_timeout', function (string $value, WC_Order $order): string {
    return '0.00:30:00';
}, 10, 2);
Csak ISO 8601 kompatibilis TimeSpan formátumot lehet megadni:
D.HH:MM:SS.
barion-woocommerce_reservation_timeout (Filter)
Kétlépcsős fizetés esetén, a foglalás időkorlátjának alapértelmezett értéke 7 nap. Amennyiben ezt módosítani akarjuk, úgy a barion-woocommerce_reservation_timeout filter segítségével ezt megtehetjük:
add_filter('barion-woocommerce_reservation_timeout', function (string $value, WC_Order $order): string {
    return '7.00:00:00';
}, 10, 2);
Csak ISO 8601 kompatibilis TimeSpan formátumot lehet megadni:
D.HH:MM:SS.
barion-woocommerce_reservable (Filter)
A kétlépcsős fizetés engedélyezése elérhető az admin felületről. Amennyiben ezt rendelés, vagy más egyedi logika alapján szeretnénk eldönteni, úgy a barion-woocommerce_reservable filter segítségével ezt megtehetjük:
add_filter('barion-woocommerce_reservable', function (bool $value, WC_Order $order): bool {
    return $order->get_total() > 10000;
}, 10, 2);
barion-woocommerce_hidden_mode (Filter)
A bővítmény lehetőséget nyújt arra, hogy csak adminisztrátorok lássák a fizetési kaput a fizetésnél. Amennyiben ennek a logikáját módosítani akarjuk, úgy a barion-woocommerce_hidden_mode filter segítségével ezt megtehetjük:
add_filter('barion-woocommerce_hidden_mode', function (bool $hidden): bool {
    return ! is_user_logged_in();
});